Update: April 2017
Planescape: Torment Enhanced Edition has been announced and will be released shortly. Current indications seem to be that this edition will be the new definitive version, having been personally approved by Chris Avellone and even including many of the fan-made tweaks below. Fingers crossed!
You can read more about it here: http://www.planescape.com
I've pre-ordered my copy. Let's see!
Edit: Yep, it's great. Just play Planescape: Torment Enhanced Edition and skip the pain below.
This is the ultimate guide to Planescape: Torment mods; Including increasing the game resolution, playing in widescreen, installing the best mods, fixing bugs, re-adding deleted missions, and running on modern operating systems like Windows 8, 7, XP and Vista.This is a complete step-by-step guide to installing, patching and improving
Planescape: Torment. It will allow you to play the game in widescreen (in any resolution you like), fix hundreds of bugs, re-add deleted missions that were cut due to time constraints, and much more.
In short: This is how
Planescape: Torment SHOULD be played.
All of these wonderful things are possible thanks to the hard work of the following
Planescape: Torment fans:
Qwinn,
scient,
GhostDog, Valerio Bigiani (
the bigg) and
Aqrit. I've also used additional help constructing this guide from
Jake,
Air, Jeff Vader and others. Thanks a lot!
If you have any problems using this guide, there is now a
TROUBLESHOOTING section at the end.
NOTE FOR GOG.COM USERS
Planescape: Torment was recently made available on the excellent Good Old Games website (aka http://www.gog.com). I'm pleased to announce that this guide is fully compatible with that version of the game, simply skip the first two steps and go straight to Step 3a. Enjoy!
Please note: It is highly recommended that you install these mods when you're starting a new game. If you're in the middle of an existing game, there can be unpredictable problems with your existing saves.
Note: The order in which you do the following steps IS important, so don't skip one unless it's 'optional' or 'recommended'.
Step 1: Install the Game (Required - of course)
You should have no problems using the normal installer, but it will only install the files found on Disc 1 (and then possibly force you to sit through an Icewind Dale trailer - arg).
WINDOWS 8, 7 AND VISTA USERS
It is highly recommended that you should NOT install the game to your C:\Program Files\ directory. That directory is a special directory and is locked by Windows to make it impossible for other files to alter what is installed there (for security reasons), which means it will potentially cause you a few problems later when you try to save games or install mods. To make life easier on yourself, just install the game to a different directory (eg. C:\Games\) or a different drive (eg. D:\).
Side note: Do NOT disable UAC in Windows -- This is akin to using a battleaxe to slice an apple!
UAC makes sure that applications do not have Administrator access on your system, while still giving YOU Administrator access when you need it. Disabling it for the sake of a game is very stupid. Don't do it!
Don't worry about doing a full-install now though, we'll get to that later in Step 2.
Step 1a: Install the official patch (Required - Only on the 4 disc or 1 disc versions!)
Note: If your copy of Planescape: Torment came on 2 discs then SKIP this step! (The patch is already pre-installed on the 2 disc version, and installing again it will cause problems within the game.)
How to install: If you're running the 4 CD or 1 DVD version then just
download the official patch (
trmt11.exe) and run the executable (it will automatically know where you've installed the game). This will bring
Planescape: Torment up to version 1.1.
Step 1b: Install language packs (Optional)
Install the language packs you want (if any).
IMPORTANT: QUICK CHECK!
Before moving on, try running Planescape: Torment and ensuring that it loads correctly. If it doesn't, then you need to redo the steps above before applying the patches below.
Ok, that's the basics done. Now let's take full advantage of your modern machine, and improve the loading speed and the graphics quality...
Step 2: Improve loading times on faster machines (Required)
Note: The step is necessary before you can perform the Steps 3a and b, below.What it does: Copying all of the game's files to your harddrive improves the game loading speed immensely and allows you to improve the graphics, too. It requires approximately 1.3GB of HD space, which should not be an issue for modern machines.
How to do it (4 disc version):
- First, create a new directory in your game directory (where torment.exe resides) and name it "CDALL".
- Then copy all the .bif files from disc 2 into this directory. (You'll find the .bif files in a folder called "cd2" on the game disc).
- Now copy all the .bif files from discs 3 and 4.
How to do it (1 disc version):
- First, create a new directory in your game directory (where torment.exe resides) and name it "CDALL".
- Then copy all the .bif files from the "cd2" directory of the disc into the CDALL directory.
- Do the same for the .bif files in the "cd3" and "cd4" directories on the disc.
How to do it (2 disc version):
- First, create a new directory in your game directory (where torment.exe resides) and name it "CDALL".
- Then copy all the .bif and .cbf files from disc 2 into this directory. (You'll find the .bif and .cbf files in a folder called "cd2" on the disc).
It will take a while to copy all these files to your HD and Windows will alert you that some of them already exist. This is perfectly normal: These are duplicate files (the same files stored on different game discs to reduce the amount of disc swapping when playing the game from CD). Just skip them or overwrite them and you will be saving yourself 500 megabytes of HD space in the process.
When you're finished you should either have 188 files (4 disc or 1 disc versions) or 108 files (2 disc versions) in the CDALL directory.
Now we just need to edit the configuration file to point to our new directory instead of the CD drive.
- Open torment.ini in Notepad. At the top should be a section called [alias] and it should look something like this:
HD0:=C:\Program Files\Black Isle\Torment
CD1:=D:\
CD2:=D:\cd2CD3:=D:\cd3
CD4:=D:\cd4
CD5:=D:\cd5
Please note: Your configuration file might not be identical to this!
The top line ("HD0:") is where the game is installed on your harddrive (as mentioned, it may be different than shown here). The next lines point to your CD/DVD drive on your computer.
We need to change it so that the "CD" lines point to this "CDALL" directory you created. So, in my case, my
torment.ini file now looks like this:
HD0:=C:\Program Files\Black Isle\Torment
CD1:=C:\Program Files\Black Isle\Torment\CDALL
CD2:=C:\Program Files\Black Isle\Torment\CDALL
CD3:=C:\Program Files\Black Isle\Torment\CDALL
CD4:=C:\Program Files\Black Isle\Torment\CDALL
CD5:=D:\Note: You can ignore the CD5 line, it's not used.
- For the next step, we're going to speed up loading times even more. Look the for the following line in the torment.ini file:
CacheSize=600
and change it to:
CacheSize=1
(The cache simply copies file from your CD to your harddrive -- since you've already done that, there's no point in getting the copy to copy them from your harddrive to your harddrive!)
- Finally, to make the game look smoother and play better, make the following changes to the following lines in the torment.ini file:
Path Search Nodes=32000
and
Maximum Frame Rate=40
- Save the file in Notepad and you're all set! (Note: Windows Vista and Windows 7 users should close and re-open the torment.ini file to ensure that the changes were saved.)
GOG.COM VERSION OWNERS START HERE!
Note: Make sure you've installed the game in a folder that isn't C:\Program Files!
QUICK CHECK!
Before moving on, try running Planescape: Torment and ensuring that it loads correctly. If it doesn't, then you need to redo the steps above before applying the patches below.
Step 3a: Install The Bigg's Widescreen mod (Highly recommended)
(Currently at version 3.05)
Note: You MUST complete Step 2 before attempting to install this mod (unless you're a Gog.com version owner)!
What it does: This awesome patch allows you to play
Planescape: Torment at a higher resolution, making the game look a whole lot better, especially on modern monitors.
NOTE
If you have existing savegames you must let the mod update them during installation otherwise they will become invalidated. (The mod will give you a choice during installation.) I strongly suggest backing up your saves first. Please note: As a side-effect of adapting your saves to the new system, all previously explored areas will be re-covered in the "fog of war".
How to install: Download from mod from here:
The Bigg's Widescreen mod (no, it doesn't matter whether you actually have a widescreen monitor or not). (If the previous link is broken, please check the
official site.)
Double-click on the downloaded file,
widescreen-v3.05.exe (it doesn't matter where the file is) and Browse to the directory on your computer where
Planescape: Torment is installed. Click
Install once you've done this.
When the new window opens, you will need to answer a series of very simple questions:
1. Choose your desired language (e.g. "0" for English followed by Enter).
2. Type "N" and press Enter to skip viewing the ReadMe file.
3. Install "Component [Widescreen Mod]" by typing "1" and pressing Enter.
4. When asked for your X-coordinates, enter the number of pixels
wide you'd like the resolution to be. When asked for your Y-coordinates enter the number of pixels
tall you'd like the resolution to be.
If you have an LCD monitor (and I'm sure 99% of you will), then you'll probably want to run the game at your monitor's highest resolution to achieve the maximum sharpness of graphics. Here's a list of common resolutions for those who feel unsure of what to type. (You can keep experimenting until you find one that looks best for you.)
| "Square" monitors |
| Widescreen monitors |
| X | Y |
| X | Y |
| 800 | 600 |
| 1280 | 800 |
| 1024 | 768 |
| 1440 | 900 |
| 1280 | 960 |
| 1680 | 1050 |
| 1280 | 1024 |
| 1920 | 1200 |
Enter the co-ordinates and press ENTER.
5. Type 'Y' to update any savegames you have.
6. Type 'Y' if you're planning to play
Planescape: Torment on more than one machine
with different display resolutions. Otherwise, just type 'N'.
7. Finally, if everything looks good, type 'Y' to install the mod. When it's finished just press ENTER.
If you have any problems during install, check this thread for help:
Common Problems Widescreen Mod.
Note: You MUST follow the next step in order to fix the graphics at your new higher resolution!
Step 3b: Install Ghostdog's incredible UI mod (Required)
(Currently at version 2.2)
What it does: Increasing the resolution of the game will knock many special graphical effects out of place, put videos in the top left hand corner of your screen, make the menu screens look really ugly, and possibly even make the text really hard to read. Luckily this mod fixes ALL the above problems... It's really quite amazing!
How to install: This mod is a little trickier to install, but it's worth it, and all of the mods in the later steps are installed the in the same way...
OPENING .RAR OR .7Z FILES
Before you begin you will need some software capable of opening .rar and .7z files. If you don't already have something, I recommend downloading and installing the excellent free utility 7-Zip.
First, download the mod from here:
Ghostdog's UI Mod.
When you've downloaded it, you'll notice it's a .7z file. You need to open it up (usually just double-clicking on the file) and extract the entire archive directly to your
Planescape: Torment directory (this is the directory where
torment.exe is).
Once you've done this, double-click on the file
Setup-GhostDog's-PST-UI.exe from within the game's directory.
Note: If Windows doesn't want to allow you to run the file, simply right-click on it, select "Properties", then "Unblock", and finally, "OK". Then try again.
In the window that opens you will be asked question, like with
Bigg's Widescreen Mod:
1. Type "N" to skip viewing the ReadMe.
2. Type "I" to install the mod.
3. You will then get five options (in various languages):
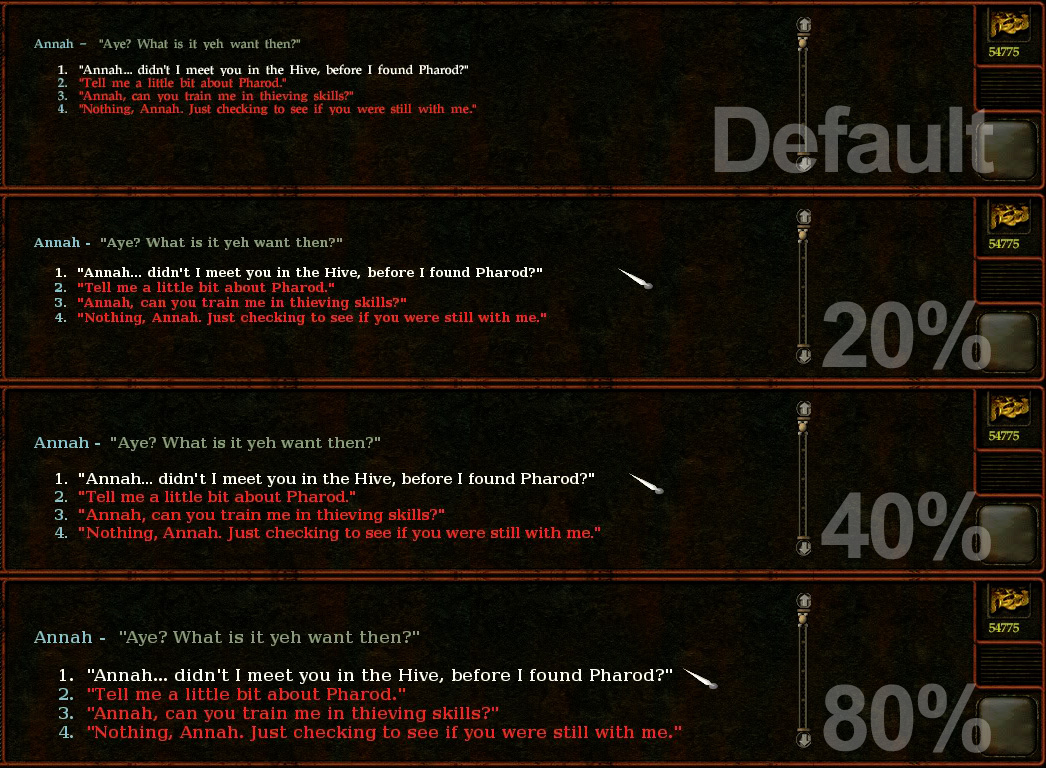
- Install the mod with the default fonts
- Install the mod with 20% bigger fonts
- Install the mod with 40% bigger fonts
- Install the mod with 80% bigger fonts
- Install the mod with 120% bigger fonts
It's a pretty hard thing to gauge from just looking at the numbers, but luckily Ghostdog has also provided a screenshot to help you decide. Take a look at the preview below to see what size is easiest to read on your monitor (click to see full size):
To pick an option, just type a number associated with it and press ENTER.
Note: If you're running Windows 7 and AVG anti-virus and you get a "permission denied" error, you may need to disable AVG's "Resident Shield" before this mod will install successfully. (Thanks to Maale for the tip.)
Note: Don't worry! As with all of the mods below, you can always run the setup file again in order to change your options. So if you don't like the font size you picked, simply run the Setup-GhostDog's-PST-UI.exe again and pick a different option!
QUICK CHECK!
Before moving on, try running Planescape: Torment and ensuring that it loads correctly. If it doesn't, then you need to redo the steps above before applying the patches below.
Step 4: Install the Ultimate Fixpack by Qwinn (Highly recommended)
(Currently at version 4.13)
NOTE
You will not be able to use your existing savegame files once you've installed the Fixpack -- you will have to start a new game. Do not continue with this guide until you're happy to start a new game!
What it does: Fixes hundreds of bugs left in the game. You
definitely want this installed before playing the game.
How to install: Download the mod from here:
Ultimate WeiDU Fixpack, and as with the previous mod, extract the entire archive to the game directory.
Then double click on the set-up file,
Setup-PST-Fix.exe, from within the game directory. (As before, you may need to manually "unblock" the file before Windows will let you run it.)
In the window that opens, enter your language number (for example, enter "
0" for English) and press ENTER. Then choose "N" (you can view the
readme later if you want).
You'll then get the option to install the following items:
- Ultimate WeiDU Fixpack, by Qwinn
- Dialogue Spelling/Grammar Corrections (English Only)
- Subtitled Cutscenes
You should choose to install
all three of these items, one-by-one. To do this, just type "I" and press ENTER for each one.
Explanation of the things you've just installed options:
- The Ultimate WeiDU Fixpack is, as you'd expect, a ton of bug fixes for the game. You definitely want this.
- The second option, Dialogue Spelling/Grammar Corrections, again corrects mistakes in the game's text (some serious, some not so serious, but all recommended).
- The final option, Subtitled Cutscenes, is also recommended as there's some very important stuff said during the cutscenes -- that you don't want to miss!
You can now play a bug fixed, generally improved, version of
Planescape: Torment, but why stop there when there's so much other great stuff to add...
Step 5a: Install Unfinished Business by Qwinn (Recommended)
(Currently at version 4.12)
What it does: The Unfinished Business patch adds many missions back into the game that the designer's didn't have time to finish. Often these are items, conversations, and even entire quests that were intended to
be in the game, but time and money constraints meant they were left out, despite being close to completion.
How to install: Download the mod from here:
Qwinn's Unfinished Business patch.
Extract all files to the game directory (where
torment.exe lives) and double-click on
Setup-PST-UB.exe.
You will then be asked, as before, which items you want to install. All recommendations in this guide assume you're a new player to
Planescape: Torment.
Do NOT install:
- All Recommended PS:T Unfinished Business Components
(Saying no to this will give you more control, below.)
You SHOULD install:
- Expanded Deionarra's Truth Mod
Do NOT install:
You SHOULD install:
- Restored Able Ponder-Thought Research
Do NOT install:
- Restored More Morte Mortuary Moments
(This is interesting if you're familiar with the game. Basically it alters Morte's dialogue tree at the very beginning, but players new to Planescape: Torment are recommended to stay with the normal version.)
- Restored Candlestick Quest
(Again, this is better for players familiar with the game, for new players it's a little buggy and confusing.)
You SHOULD install:
- Restored Deionarra's Truth Conversations
Do NOT install:
- Restored Pendant of Yemeth Quest
(See Restored Candlestick Quest above for the reason why.)
You SHOULD install the rest of the mods. Each slightly improve and expand on the game in their own way:
- Restored Elyce and Company
- Restored Curst Citizens
- Restored Curst Prisoners
- Restored Carl Parfidor
- Restored Morte & Ingress's Teeth Banter
- Restored Alley of Dangerous Angles Thugs
- Restored Items
- Restored Party Comments and Banters
- Restored Mebbeth
- Restored Lower Ward Encounters
- Restored Bestiary Entries
Note from Qwinn: You MUST keep an item from Ravel's Garden through most of the game to complete the "Expanded Deionarra's Truth Mod" quest. This item has multiple other uses. You may have to forego the other uses to keep one until you need it near the end of the game. You have been warned!
Step 5b: Install Tweaks Pack (Recommended)
(Currently at version 4.12)
What it does: This patch tweaks and rebalances elements of the game. These are things that make the game more enjoyable to play, and have been requested by players since it was released.
How to install: Download the mod from here:
Qwinn's PS:T Tweak Pack.
Same as before, extract all files to the game directory. Then run
Setup-PST-Tweak.exe.
As a new player you SHOULD install the following:
- Banter Accelerator (30 mins)
Do NOT install:
- Dustman Robes Area Restriction Removal (it's a minor tweak for advanced players that may cause crashes)
You SHOULD install:
- BG2-Style THAC0 Display (makes your stats slightly easier to understand)
- Stackable Rings, Charms, Bracelets, Scrolls
- Explore City Areas
Do NOT install:
You SHOULD install:
Do NOT install:
You SHOULD install:
- Maximized HP Per Level for TNO and Party
- Maximized Friends Spell
These are very minor changes. I recommend NOT installing them, but it's up to you:
- No Battle Music
- Use Floating Text Font Globally
Do NOT install:
- Identify All Items
- Early Glabrezus Tweak
- Power Action Leprechaun Annah, by Black Isle
- Easter Egg Morte, by Black Isle
- Add Quickload (it's unstable, sadly)
- Rest Anywhere
- Tome Of Cheats
Note: You can change your mind and add/remove any of these items later by running Setup-PST-Tweak.exe again.
Step 6: Install Aqrit's DDrawFix (Recommended -- Not needed by GOG.com users!)
(Currently at version 1.0)
Finally, modern PC users will need to install the following mod to remove any graphical glitches their state-of-the-art graphics card creates with an old game like this.
Download and instructions can be found here:
http://bitpatch.com/ie_ddrawfix.html
It installs the same way as the previous mods (extract the archive to your
Planescape: Torment folder and run the executable).
CONGRATULATIONS!
You're all done! You can relax, start-up Planescape: Torment and enjoy one of the greatest games ever made in the best possible configuration. Hurrah!
Step 7: Help! I don't know what stats to give my character!
I've done everything you've suggested and the first screen I'm presented with is a bunch of stats for my character. How should I distribute them for the best Planescape: Torment experience?
Fear not, the answer is pretty much unanimous for this RPG. Everyone agrees that, unlike most games of this genre, WISDOM is the most important attribute, followed by INTELLIGENCE, and then CHARISMA.
Boosting these stats will open up more of the story to you.
As such, it's been suggested that the following starting stats are best:
WIS: 18
INT: 17
CHR: 13
CON: 9
STR: 9
DEX: 9
DEXERITY is considered the least important attribute of the game.
For a further, spoiler free, guide for beginners, I recommend reading Orion79's
Beginner's Guide.
Good luck!
TROUBLESHOOTING
If you're having any problems, here's a quick list of common issues with solutions.
Problem: I've installed the game onto my harddrive but it still asks for disc 2! What's going on??
Solution: This guide does NOT remove copyright protection(!). You will still need to have your
Planescape: Torment disc inserted in order to play this game. There are a couple of "no cd" fixes to be found on the internet, but these will, unfortunately, most likely interfere with the many updates featured in this guide.
(Note: If you're having weird issues that nobody can help you with and you're using a "no cd" fix, that could be the cause. Unfortunately, if you didn't make a back-up of the original
torment.exe file before you applied the "no cd" patch, then you will have to restart the installation of
everything from scratch. :( )
Problem: I still don't get it. I copied all the game files onto my harddrive in order to make it quicker... so why does Planescape: Torment need the disc in the drive when I run it?
Solution: Yes, you are running the game from your harddrive, but while the game is loading it checks to see that you own the original game by looking for the game disc in your drive. Once it has finished this quick security check, everything else is being loaded from your harddrive.
Problem: I keep being asked to register my game, it's very annoying!
Solution: Very easy solution here, just go to the game folder (where
torment.exe is) and delete the folder called
ereg. This will stop that annoying pop-up from bugging you. (Thanks to
Killah Mate for sharing this bug fix!)
Problem: The default game icon looks really cruddy on my Windows Vista/7 desktop
This bugged me, too, so I made this little replacement icon. Much better!
 Download the Vista/7 compatible icon
 (right-click save as...).
Problem: I have another problem that is not listed here :(
Solution: Try looking in
this thread on the Spellhold Studios website. Hopefully you will find your answer there. (If you not, you could try asking for help. Some kind soul may know what to do.)
If you have any suggestions on how to improve this guide, please post it below. Thanks everyone!